After my post a few weeks ago featuring the Mr Drippy Amigurumi on Kitten’s Crafts, I decided I wanted to make myself one, and then make a cursed version of Mr Drippy (before he comes to life!) So, with permission, I adapted the pattern to make my very own cursed Mr Drippy amigurumi pattern!
Please DO NOT sell anything made from this pattern. I do not own the rights to the character Mr. Drippy and so it would be illegal to make profit from it. Also, part of this pattern is by Jastra Alethea on Kitten’s Crafts, and she has asked that nothing made from her pattern, which is freely available, is sold. Make them for yourself or as a gift, but please, do not sell them! Thank you!
You will need:
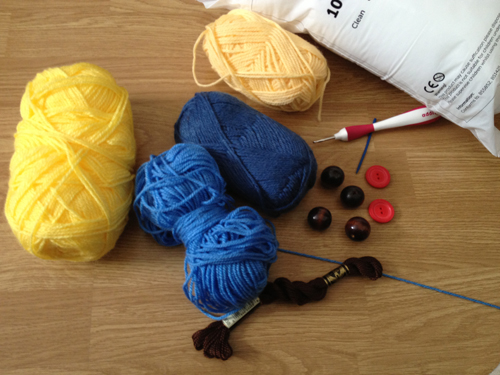
Yarn in bright yellow, pale yellow, bright blue and dark blue (optional – you only need a tiny bit!), yarn or thread in brown, 4 round wooden beads, 2 red buttons, crochet hook (mine is 3.25mm, use a size that works with your yarn) and toy stuffing.
I worked my Mr Drippy in the round. The original pattern says not to, but that’s how I like to work, and it worked well, so I guess you can do it either way :)
Body (this is the same as the body from the original Mr Drippy pattern)
In bright yellow (this is the start of the top of the head)
1) 6sc in magic ring (6)
2) 2sc in each sc around (12)
3) [sc in next sc, 2sc in next sc] around (18)
4) [sc in next 2sc, 2sc in next sc] around (24)
5) [sc in next 3sc, 2sc in next sc] around (30)
6) [sc in next 4sc, 2sc in next sc] around (36)
7) [sc in next 5sc, 2sc in next sc] around (42)
8) [sc in next 6sc, 2sc in next sc] around (48)
9) [sc in next 7sc, 2sc in next sc] around (54)
10) [sc in next 8sc, 2sc in next sc] around (60)
11 – 20) sc in each sc around (60)
21) [sc in next 5sc, 2sc in next sc] around (70)
22) [sc in next 13sc, 2sc in next sc] around (75)
23) [sc in next 14sc, 2sc in next sc] around (80)
24 – 25) sc in each sc around (80)
Change to bright blue wool
26 – 39) sc in each sc around (80)
40) [sc in next 18s, dec over next 2sc] around (76)
41) [sc in next 17sc, dec over next 2sc] around (72)
42) [sc in next 16sc, dec over next 2sc] around (68)
43) [sc in next 15sc, dec over next 2sc] around (64)
44) [sc in next 14sc, dec over next 2sc] around (60)
Begin stuffing the body here and continue to stuff as you go along
45) [sc in next 13sc, dec over next 2sc] around (56)
46) [sc in next 12sc, dec over next 2sc] around (52)
47) [sc in next 24sc, dec over next 2sc] around (50)
48) [sc in next 23sc, dec over next 2sc] around (48)
49) [sc in next 6sc, dec over next 2sc] around (42)
50) [sc in next 5sc, dec over next 2sc] around (36)
51) [sc in next 4sc, dec over next 2sc] around (30)
52) [sc in next sc, dec over next 2sc] around (20)
53) dec over next 2sc around (10)
Add final amounts of stuffing
54) dec over next 2 sc around (5)
Sew the body closed and fasten off.
Nose (this is NOT the same as the original pattern)
In light yellow
1) 4 sc in magic ring (4)
2) 2 sc in each sc around (8)
3) [sc in next 3 sc, 2 sc in next sc] around (10)
4) [sc in next 4 sc, 2 sc in next sc] around (12)
5) [sc in next 5 sc, 2 sc in next sc] around (14)
6) [sc in next 6 sc, 2 sc in next sc] around (16)
7) [sc in next 7 sc, 2 sc in next sc] around (18)
8) [sc in next 8 sc, 2 sc in next sc] around (20)
9) [sc in next 9 sc, 2 sc in next sc] around (22)
10 – 20) sc in each sc around (22)
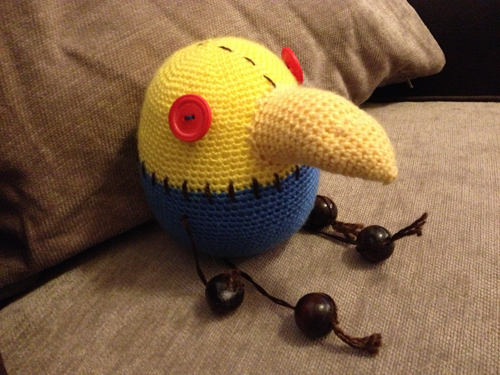
Finish off and leave long tail for sewing on. Stuff firmly before sewing on to the body in the appropriate place, and mould nose to the correct curved shape (I used a drawstring to keep the nose curved)
Using dark blue yarn, sew the red buttons on either side of the nose (can be done with the same brown yarn as the stitching if you don’t have any dark blue yarn)
Using the brown yarn, make a stitch line along the top of the head (from the top of the nose to the end of the yellow section on the back) and stitch around the colour change as shown in the picture.
Tie the beads onto long pieces of brown cotton and tie onto the main body between the stitches. I used a slipknot to tie them on. Leave ends of the yarn outside the beads to make the tassels.
Tah-dah! You’re all done! Try not to cry on him, or he might just come to life!!
It’s actually really easy to make a cursed Mr Drippy, as he’s a lot more simple than the real one.
I must re-iterate that this is based completely on the Mr Drippy Pattern by Kitten’s Crafts! It is not completely my original pattern! I gained her permission before making this altered pattern, as I wanted my Cursed Mr Drippy to match my normal one!

Looks FAB!!!! xx
wow! thanks for this! i love to create amigurumi dolls but only a few good ones have a free pattern… thanks a lot… I’ll try to do this and I wish I’ll have the same effect as yours did… haha… hope I’ll get it right. :)
pleaseeee tell me you have an etsy or something!! i want a cursed drippy so bad by fanime but i m too lazyyy lol
I’m afraid he’s not for sale! As the pattern isn’t entirely mine I don’t have the rights to sell what I’ve made from it, and there’s also issues with copyrighting. Sorry about that!
soooo much sadnesss, okayyy lol thanks anyway, awesome work, i love it. (but you could still sell them on etsy, considering its handmade fan work)
Hi, these look amazing! I am trying to make some for myself, but am running into problems. Did you use a continuous spiral method or did you join the rounds with slip stitches? I have been joining the rounds and have a weird seam running round Mr Drippy! Any help is greatly appreciated. Thanks.
Hi Em, these are all worked in continuous rounds. Hope this helps :) Jenny.
Thank you so much for getting back to me so quickly! I have started a new version in continuous rounds and the seam is gone, hoorah! Thanks for the help. :)
I really want to make a Cursed Mr. Drippy but I have never crocheted before, only knitted. I’m not sure what half of the instructions mean or if I should even attempt this as a beginner. Thoughts?
Sadly the link to the original Mr Drippy pattern no longer works….