May 1

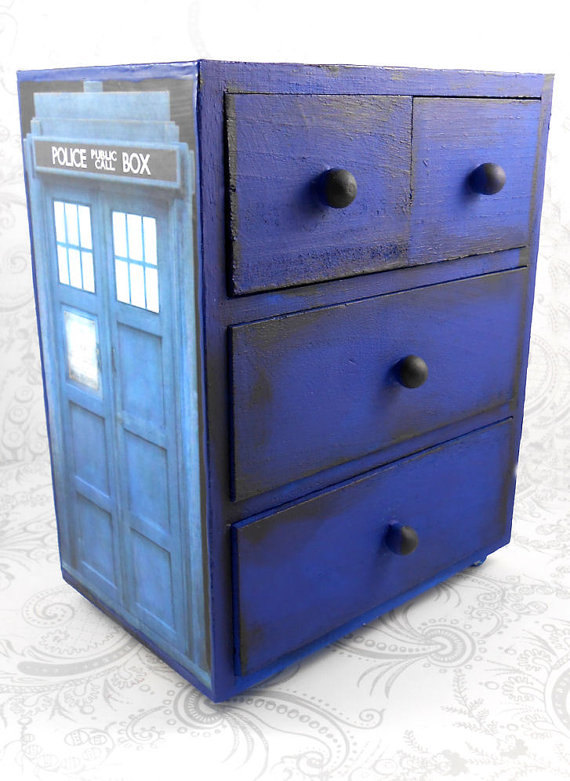
Custom TARDIS Inspired Jewelry Box

il_570xN.494557300_5ho0

pzcreations22 of Texas created this custom jewelry box for her Etsy store. The TARDIS inspired four drawer jewelry box is 7 1/4 inches tall, 6 inches wide, and 3 inches deep, (I wonder if it’s bigger on the inside!) and has a satin finish.

Because it is a custom made box, pzcreations22 said it will take 5-7 days to complete. But the TARDIS isn’t your thing to stash your jewelry away, there are other choices, including Sherlock Holmes, Twilight from “My Little Ponies,” The Golden Girls, and more.

April 3

“Adventure Time” Mini Quilt

336241_26Feb16_IMG_6966

Roler recently posted this mini quilt on Craftster that she made. She made it for a cartoon-themed swap. Her partner loves “Adventure Time,” so Roler decided to make her a mini quilt wall art with her four favorite characters.

For anyone not familiar with the show, the characters, starting clockwise from top left, are Finn the Human, Lumpy Space Princess, Peppermint Butler, and Jake the Dog.

Roler said it’s a beginner quilt for her and about the size of the average place mat.

Category: Craft, Geek, TV | Comments Off on “Adventure Time” Mini Quilt
March 28

Trekkie Oven Mitt Tutorial

Star Trek Oven Mitts by Sew Can Do

Planning on serving up some stewed gagh or steamed Raktajino? Then you’ll want to have some Star Trek oven mitts on hand. Fortunately, Cheryl at Sew Can Do has put together a tutorial to help you out.

These fully insulated mitts have easy slip-on hand pockets and feature some of the fun Star Trek prints now available, though you could customize with any number of geeky fabrics. Two-1/2 yards of cotton fabric, 1/4 yard Insul-Bright, and 1/4 yard Cotton batting, plus basic sewing tools are all you need to outfit your kitchen in Star Trek/geek style.

How would you deck out your kitchen? Star Trek, or another fandom? Share your fav in the comments below!

Links of Interest:


Category: Craft, Geek, Movies, Sci-Fi, TV | Comments Off on Trekkie Oven Mitt Tutorial
March 6

Step into the Future (or Past) with Doctor Who Stepping Stones

DIY Doctor Who Stepping Stones by Our Nerd Home

When traveling through all of time and space, it helps to have a path. Pave the way with these DIY Doctor Who Stepping Stones, thanks to Our Nerd Home.

One of many geektastic tutorials on their site, the Stepping Stones how-t0 (ahem) steps you through the whole process from pro tips for mixing up the Quikrete, to the Gallifreyan translator app they used.

For their project, they of course chose to spell out, “Our” “Nerd” “Home” + “Geek,” but with a translator, you could make your stones spell out whatever you like. What would you spell with your stones? Share with us in a comment below!

Links of Interest:

February 7

I Wanted To See The Universe, So I Made a TARDIS and I Ran Away.

I didn’t see anything that really struck my fancy to post about today, so I decided to post one of my own projects: my very own refinished TARDIS!

Well over a year ago, while doing some Christmas shopping for the 2014 season, we ended up at a store called At Home. There was a lot of interesting things there but I didn’t end up buying anything. However, they did have two different sized TARDIS cabinets that I realllllllllly wanted. (They don’t show them on their website so, I don’t know if they still carry them in store.)

I talked myself out of either of them, because I need more furniture like I need a hole in the head. But the thought of those lovely blue cabinets never left me. Fast forward to about a one month ago. I decided it was time to transform a small cabinet I already had into a version of the TARDIS. I only spent about $28.50 on this refinish.

This is what I started with. I don’t believe this is solid wood, but rather some kind of compressed sawdust kind of thing, mixed with something else. It doesn’t feel like pure wood. I’ve had it since probably 2005, if not longer. It was something my mom bought for me at Hancock Fabrics. I always thought it was fairly homely but it’s function was too good. It’s been where I’ve stashed my paints and PS2 games in the past.

Sorry for the potato here. I removed the top (unneeded) drawer pull and filled the hole with wood filler. I found the windows, St. John’s ambulance, police box signs and public sign on various websites, printed them to fit, and then decoupaged them on with some Modge Podge. The window trim is actually automobile pin-striping tape from Pep Boys.

I liked how the front door of the cabinet had that faux trim and recessed area on it, so I tried to recreate a version of it on the sides. these are $1 wood frames from AC Moore, with thin wood trim, from Michael’s, mitered and added to the sides.

I thought about adding some simple Home Depot stock furniture legs to it, to raise it up a little bit and give it more of a weight in my room, but I decided against it. I thought it would take away from that perfect “base” it already sits on.

I also tried my hand at some distressing/weathering painting all around the TARDIS. I bought some craft paint in lighter and darker shades of blue, and then finished it off with some clear coat to help seal it. My TARDIS is well-traveled. It’s been through a lot.