Search Results for: paper crafts

August 8

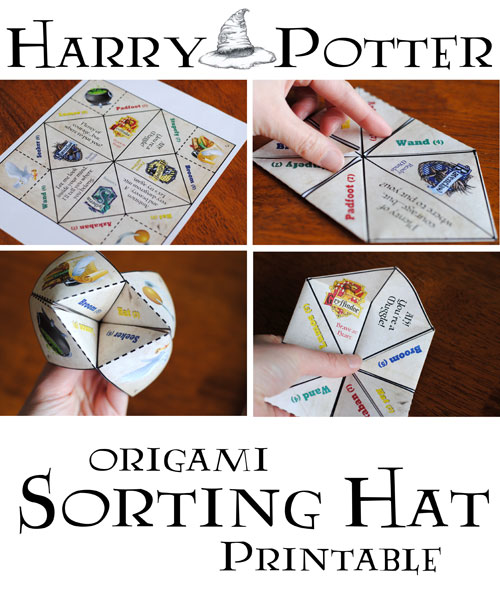
You Need An Origami Sorting Hat Game

HarryPotterSortingHat

Who doesn’t need an Origami Sorting Hat? Lucky for us all that Adelle Belnap from the blog Packed With Fun has created this adorable (and FREE!) printable Origami Sorting Hat game.  Her post includes a link to download your own Sorting Hat along with plenty of pictures and instructions.  Looks to me like this would be a fun way to spend an afternoon with friends (or the kids, or by yourself).  Enjoy!

More Links of Interest

Category: Craft, Geek, Movies, Toys, Tutorial | Comments Off on You Need An Origami Sorting Hat Game
August 1

T-Shirt DIYs for Back To School

PaintedR2D2TShirt

Back to school time doesn’t have to suck.  Make your own (or someone else’s) wardrobe super cool with these fantastic T-shirt ideas from Natalie over at Doodlecraft.  She uses freezer paper to make stencils and paint designs onto t-shirts.  You can download some of the designs she features on her blog, but it wouldn’t take much to come up with your own.  Once you have your design, you can make a stencil out of freezer paper (either with a cutting machine or with a little elbow grease and an exacto knife). The cool thing about freezer paper is that you can iron it onto fabric and it sticks into place, making it the perfect stencil.  Once your design is painted on and dry, you simply peel off the freezer paper and your custom t-shirt is ready to go.  The blog post takes you step-by-step through the process, complete with awesome pictures.

What designs would you want to make for your own back-to-school wardrobe?

More Links of Interest

Category: Geek | Comments Off on T-Shirt DIYs for Back To School
July 26

Create Your Own Studio Ghibli Scenes

Make this amazing Studio Ghibli catbus from My Neighbor Totoro with the help of a papercrafting kit. Learn more on GeekCrafts.com.

Thanks to Mental Floss and RocketNews24, we now know about some amazing kits that allow you to use paper to recreate iconic scenes and sites from Studio Ghibli films, such as “My Neighbor Totoro” and “Spirited Away.”

The papercraft kits by Sankei include everything you need to create the cat bus (pictured above) from Totoro, Howl’s Moving Castle, the Jiji house from “Kiki’s Delivery Service,” and more.

The kits are available on Amazon, and are a little pricey, since they ship from Tokyo, but may be well worth it for big Studio Ghibli fans.

What Studio Ghibli scene would you most like to create? Let us know in the comments below!

Links of Interest:

P.S. On a related note, you may also be interested in this post from RocketNews24: Studio Ghibli letter sheds new light on Spirited Away mysteries.

Category: Anime, Craft, Geek, Movies | Comments Off on Create Your Own Studio Ghibli Scenes
July 11

Make a Sonic Screwdriver Quilt Block

SonicScrewdriversQuiltBlock

Have your choice of sonic screwdrivers at your fingertips with this cool (and FREE!) paper piecing pattern from Fandom in Stitches.  You can thank Fandom in Stitches contributor Gretchen Kohlhaas for this great idea.  You can download the pattern here, but keep in mind this one’s geared towards folks who know what they’re doing! Not sure how to do paper piecing? Try checking out the Tutorials page on Fandom in Stitches to get yourself started!

More Links of Interest


Category: Craft, Geek, Sci-Fi, Tutorial | Comments Off on Make a Sonic Screwdriver Quilt Block
June 14

Let’s Go, Bub! A Wolverine Build

T6YVKdr

DancinFool82, of The Armored Garage, recently unveiled his Wolverine costume at Emerald City Comicon, in a series of photos over on Imgur. He designed it based on Batman’s suit in Arkham Knight Origins.

IN starting out with the chest, he traced out the parts in Photoshop. He loaded that image up in 3d studio max and traced out the shapes with geometry, and then loaded that geometry in a program he wrote himself, Armorsmith, to get the final adjustable templates that could be printed out on paper. To then get the clean bevel on the foam pieces, DancinFool82 used a technique called undercutting which involves cutting a channel on the underside of the foam and then filling that channel with hot glue and bending the foam. In order to get the nice rounded look, he used a Dremel to grind away the outer edge of the foam and get a nice soft curve. Then he hit the pieces with a heat gun and shaped them just a little bit to make them look more curved.

There are a ton of pictures in his Imgur album, and he explains each of them.

Category: Computers, Craft, Tutorial | Comments Off on Let’s Go, Bub! A Wolverine Build
May 9

Han Solo’s Blaster From “A New Hope”

hanblaster

This is actually a tutorial I’m following myself: recreating Han Solo’s blaster from Star Wars, Episode 4: A New Hope. I started off with the orange and white costume gun from Amazon. OB1Al wrote this tutorial as someone with an interest in making a variety of movie props.

Lightly sand the blaster with a fine grade sandpaper, remove the lettering on the side this way too. Prime with grey auto-primer and leave for a day or two to dry. If you intend to take this blaster to any cons, you may want to leave the end of the barrel orange so it’s still event-appropriate. You can just cover it with some tape when you hit it with the spray paint.

Add a base coat of silver (just use regular silver, NOT metallic silver as it doesn’t take the top coats very well). Leave to dry again. Add a coat of matte black paint. Once it’s dry. highlight the barrel and sight with a gloss black, to add a bit of depth to the paint-job.

Now, using fine grade sandpaper, CAREFULLY begin the weather the blaster by removing parts of the black paint, exposing the silver color underneath. Try to pick areas which would naturally receive wear and tear from normal use. You can also add some weathering topically (i.e., with a small artist brush in places). Weather the sight with some brass colored paint for greater authenticity.

Now, choose a nice brown wood-colored enamel for the grips. Carefully paint in the two sides of the grip and leave to dry. Once dry, spray a little bit of the matte black onto a saucer and dip your finger in it, wiping off most of the excess. Carefully rub some of the black into the brown grip area, giving some depth to the paint and weathering the area. Finally, use your brass colored paint to paint the ‘screws’ in the middle of the grips.

Category: Craft, Movies, Sci-Fi, Tutorial | Comments Off on Han Solo’s Blaster From “A New Hope”