Star Trek Costumes from Trek in the Park

This summer Atomic Arts put on an amazing free play here in Portland:

Atomic Arts is presenting a LIVE free performance of the classic Star Trek episode “Amok Time” at the Woodlawn Park amphitheater. Witness Mr. Spock undergo the bizarre and brutal Vulcan marriage ritual of PON FARR as the crew of the U.S.S. Enterprise attempt to save him before it’s too late!!

Portland actors, accompanied by live music and effects, will bring this classic piece of television to life! Spend a day in the park, bring a picnic and BOLDLY GO!!

The costumes and sets were all handmade — very inspiring, especially with Halloween around the corner! Here’s an ensemble photo by Igal Koshevoy:

There are also lots more Trek in the Park photos on flickr and some videos up on YouTube.

We went to the final show, which was fantastic — and standing room only. Next summer they’ll be back with a new episode which was thrillingly previewed at the end of the show. If you’re in Portland or nearby, don’t miss it!

Kids Yoda Costume

I mentioned last month that I was hoping to make a Yoda costume for my daughter Pearl, and yay, I finished it! I wrote it up as a tutorial for CRAFT: as part of their big Halloween round-up.

This is a super easy project to do if you sew — I finished it within a week. My favorite parts to make were the hat (I used Heather Mann‘s tutorial and actually made a little set of three in different sizes),

and the snake.

Please let me know if you make a Yoda costume too, I’d love to see it!

New Moon + Mario Mushroom Wrist Warmers

Knitter extraordinaire Vickie Howell has designed not one but two awesomely geeky sets of wrist warmers, and both patterns are free online! This week she published the Alice Wrist Warmers pattern over at CRAFT:, inspired by the upcoming New Moon movie… these would be perfect to complete your Twilight-inspired Halloween costume in style!

And her Mario Mushroom Wrist Warmers are a favorite from last year that are just the thing to knit up as the temperature drops. This pattern is available in kids’, women’s or men’s sizes and includes a handy (and cute) charted image for creating your mushroom.

Spooky Halloween Crafts

Designer Blair Stocker (who you might know from her fun and colorful blog, Wise Craft) has just posted a fantastic series of free craft project tutorials for Value Village — yes, that Value Village. Her projects take regular old thrift-store finds and upcycle them into striking, spooky Halloween decorations for your house, or for throwing a party!

Blair says: I wanted to use items that could be found any time of year at Value Village or other thrift store, not just during the Halloween season, so I resisted buying Halloween things, that just seemed too easy. The other thing I really wanted to do was to create projects that were “low sew” or even “no sew”, the idea being that anybody should be able to jump in and do these projects with materials they find for very little money.

The most effortlessly geeky project of the whole collection has to be these Dolls of the Living Dead. I’ve seen so many neglected Barbies at thrift stores and yard sales and this is a brilliant — and super-easy — zombie makeover to the rescue!

Blair mentioned that her personal favorite was the Sinister Ceramics — tchotkes painted black with sparkly rhinestone eyes glowing red. I love the grouping as a table centerpiece, very Edgar Allen Poe!

There are a dozen more projects to download from the site, from Peculiar Picture Frames (goth-inspired silhouettes) to Perfect Pumpkin Ornaments (which have a charming Nightmare Before Christmas feel to me). And of course you could put a very geeky spin on any of Blair’s ideas!

What are you thinking of making for Halloween parties this year?

Red Queen costume for Dragon*Con

My friend Ruth Suehle sewed, beaded, wired, embroidered, and stamped herself an incredibly intricate crown-to-toe Red Queen costume for this year’s Dragon*Con — and won the Best Journeyman prize for her handiwork!

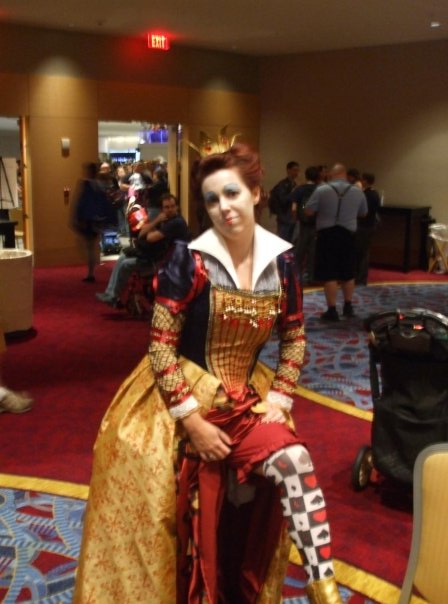
photo by Weston Clowney; all other photos by Ruth Suehle

I asked her how she made it, and she had lots of details to share…

When I first decided to work on the Red Queen’s costume, I had only one picture to go on. This one. I was planning to wing it for everything below the waist.

My first step was to figure out if I could do what for me would be the three hardest things: Get my hair that red without bleaching it, cover my eyebrows without shaving them, and make the collar stand up like it should. With the answers (respectively) of Manic Panic, this drag queen’s video, and “umm…I’ll figure it out with some stiff interfacing,” the project was underway.

After I got started, the photos from the August issue of Vanity Fair came out with the full-length shot. They also included one that showed her tights, bloomers, and shoes. That meant more work to do! Fortunately, I found the tights on yandy.com (that site is not SFW!) and a pair of usable boots at a thrift store, which I painted gold.

I didn’t get my hair quite flaming red, but I can attest that Manic Panic Rock ‘n Roll Red will get you pretty red over medium-dark brown hair with no bleaching.

Fabric breakdown by part:

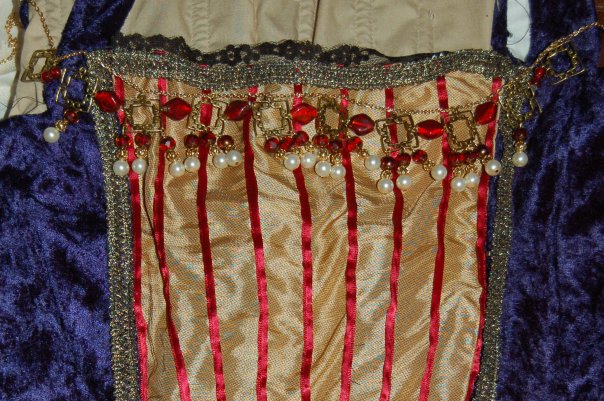
Bodice: gold taffeta with black tulle overlay. Sides and back of blue panne velvet. Detail in ribbon, lace, and trim.
•Hand-beaded top using wire, ribbon, beads, and findings. Matched detail as closely as possible (for example, counted 20 sets of pearl drops).


•Blue sleeves attached to bodice. Ribbon on sleeves hand-beaded.

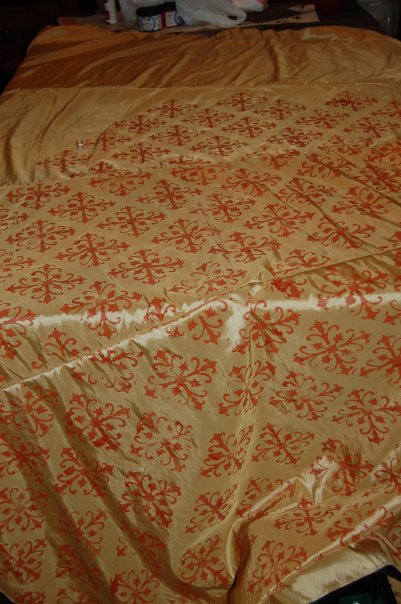
Overskirt: Gold taffeta stamped to resemble pattern in original costume.


Underskirt: Red taffeta.
•Black hearts created from satin with Wonder Under adhesive.


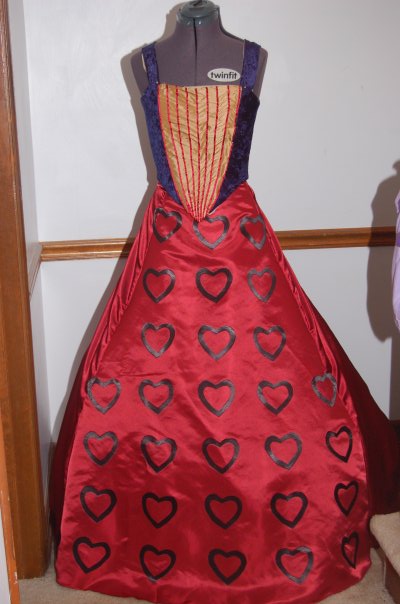
•Gold hearts machine embroidered, cut, and sewn loosely in centers of black hearts.

Shirt: white cotton with navy tulle overlay. Yellow/gold stretch knit sleeves. Detail in beaded ribbon and white cuff trim.
•Black webbing hand-knotted with 80 yards of embroidery floss.
•Gold sleeves are attached to undershirt.
•Shirt is attached to corset foundation.

Crown: foam sheet, wire for shaping, rhinestones, textured paint, gold

Skirt foundation: (not pictured) white muslin and boning

Bloomers: Burgundy cotton with machine-stitched scallop hem

Color choices
The colors are a bit different from the first pictures that came out to the Vanity Fair photos as well as those I’ve seen from when the costumes were on display at Comic-con. More vibrant, for one. And in that first one, the upper sleeves and undershirt looked to me to be clearly blue, whereas in the others, they appear to be black. I usually wouldn’t be excited about combinations of blue and black, but since I’d already bought fabric, that’s the way I went, and I think it works.

Thank you so much, Ruth! You can see another shot of the Red Queen (with the Mad Hatter!) here.

Lego Halloween Costume

Two years ago, CRAFT: did a fun round-up of quick and easy Halloween costumes to make for kids, and Diana Eng made a fantastic Lego costume out of a cardboard box!

You could easily adapt this to an adult size, or make a whole flock of them in different colors for you and your friends — and how cute would a toddler be Lego-ized?

For more Halloween costume ideas for kids, check out CRAFT:’s other tutorials for pirate, bee, sushi, and monkey costumes. I made the monkey one with my nephew in mind, and it’s one of my favorite projects ever!