Custom TARDIS Inspired Jewelry Box

il_570xN.494557300_5ho0

pzcreations22 of Texas created this custom jewelry box for her Etsy store. The TARDIS inspired four drawer jewelry box is 7 1/4 inches tall, 6 inches wide, and 3 inches deep, (I wonder if it’s bigger on the inside!) and has a satin finish.

Because it is a custom made box, pzcreations22 said it will take 5-7 days to complete. But the TARDIS isn’t your thing to stash your jewelry away, there are other choices, including Sherlock Holmes, Twilight from “My Little Ponies,” The Golden Girls, and more.

I Wanted To See The Universe, So I Made a TARDIS and I Ran Away.

I didn’t see anything that really struck my fancy to post about today, so I decided to post one of my own projects: my very own refinished TARDIS!

Well over a year ago, while doing some Christmas shopping for the 2014 season, we ended up at a store called At Home. There was a lot of interesting things there but I didn’t end up buying anything. However, they did have two different sized TARDIS cabinets that I realllllllllly wanted. (They don’t show them on their website so, I don’t know if they still carry them in store.)

I talked myself out of either of them, because I need more furniture like I need a hole in the head. But the thought of those lovely blue cabinets never left me. Fast forward to about a one month ago. I decided it was time to transform a small cabinet I already had into a version of the TARDIS. I only spent about $28.50 on this refinish.

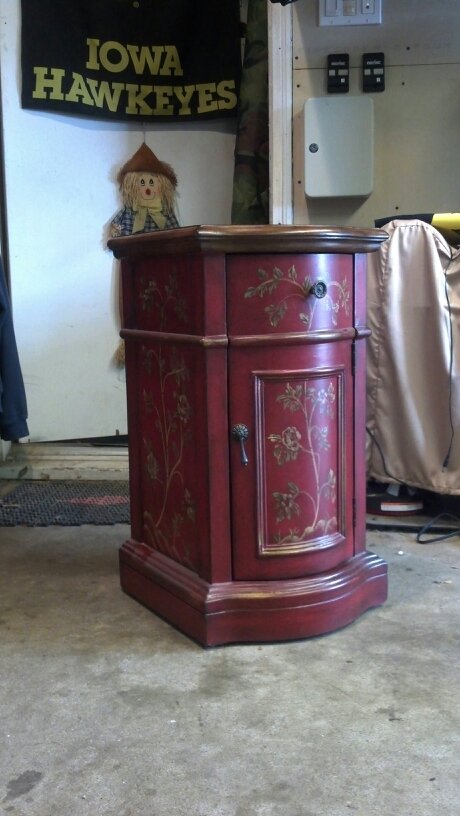
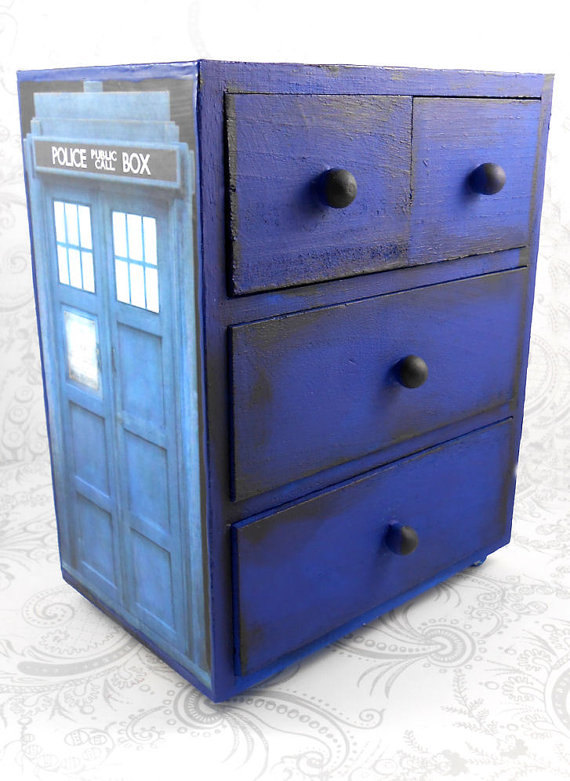
This is what I started with. I don’t believe this is solid wood, but rather some kind of compressed sawdust kind of thing, mixed with something else. It doesn’t feel like pure wood. I’ve had it since probably 2005, if not longer. It was something my mom bought for me at Hancock Fabrics. I always thought it was fairly homely but it’s function was too good. It’s been where I’ve stashed my paints and PS2 games in the past.

Sorry for the potato here. I removed the top (unneeded) drawer pull and filled the hole with wood filler. I found the windows, St. John’s ambulance, police box signs and public sign on various websites, printed them to fit, and then decoupaged them on with some Modge Podge. The window trim is actually automobile pin-striping tape from Pep Boys.

I liked how the front door of the cabinet had that faux trim and recessed area on it, so I tried to recreate a version of it on the sides. these are $1 wood frames from AC Moore, with thin wood trim, from Michael’s, mitered and added to the sides.

I thought about adding some simple Home Depot stock furniture legs to it, to raise it up a little bit and give it more of a weight in my room, but I decided against it. I thought it would take away from that perfect “base” it already sits on.

I also tried my hand at some distressing/weathering painting all around the TARDIS. I bought some craft paint in lighter and darker shades of blue, and then finished it off with some clear coat to help seal it. My TARDIS is well-traveled. It’s been through a lot.

Geek Girl Brunch + Comic Book Ornaments

Geek Girl Brunch

I don’t think I’ve yet shared the awesomeness that is Geek Girl Brunch. I discovered it via the Female Geek Bloggers G+ Community, and was immediately intrigued. Ladies getting together to share brunch, drinks, and geek-talk? Sign me up!

The group started in New York City, with its own meetups. They had so much fun together that they decided to roll out chapters, not only across the U.S but worldwide! Sensing I had found my geek tribe, I signed up to be notified about news of the Kansas City chapter. I got an email a few months later notifying me that chapters were forming, and would I like to be an officer to help launch the KC chapter? Because I love my hometown and want to nurture its geek culture, I said yes!

We had our first brunch in July – an informal meetup at the Cheesecake Factory, followed by Star Wars Day at Barnes & Noble. In September we gathered at the Renaissance Festival and strolled the grounds together. Other chapters have enjoyed a wide variety of themes, from a Zombie Crawl to a Xena-themed yoga session to a Pixel Perfect ode to video games.

Next week is KC’s third event, with a “Let’s Get Crafty” theme. My co-leader, another brunchette, and I are each leading a geek-craft. My craft is comic book ornaments, as seen in the examples below. I figured it was an easy introduction to decoupage, but infinitely customizable to whatever comic brunchettes might favor, along with whatever ornament base they might choose.

Comic Book Ornaments by Angie Pedersen

Basic instructions:

  1. Select ornaments in shapes that will showcase an identifiable amount of comic art, in shapes that should be easy to cut out.
  2. Page through your comics for images that will fit your ornament. TIP: If the image you want is too big, you can scan it and resize to fit your ornament. That’s what I did for the Dr. Horrible cube above.
  3. Place the ornament on top of the comic page and trace around it. Cut out with scissors.
  4. Brush Mod Podge (I used matte, but glossy would also work) on the ornament and position the comic cut out on top. Smooth out any wrinkles (a brayer helps here).
  5. Brush a coat of Mod Podge over the surface of the comic image to seal.
  6. Optional: embellish the edges of the ornament with decorative washi tape (see Buffy example above) or acrylic paint (see TARDIS example above). For the Dr. Horrible cube, I colored the top of it with a bronze metallic Sharpie (top not shown).

I hope you will check out Geek Girl Brunch and join in on the fun! If you’re in the KC area, stop by and say hi!

Links of Interest:

Optimus Prime + The TARDIS = Awesome.

tardis-transformer-1

I love Transformers. I love Doctor Who.  So, what’s not to love about a 3-D printed, actual working/transforming Tardimus Prime??!! Seriously.  What’s not to love? Inspired by Jason Casteel’s TARDIS Prime artwork, user Ellindsey designed and created this 3-D printed realization, and it actually transforms.  What’s even cooler is you can find Ellindsey’s CAD files and instructions for building your own. Oh, for a 3-D printer.  Even you don’t have one, you should definitely check out the link for the additional pictures.  Transform and roll out!

The Doctor says bless you!

TARDIS tissue box cover by Charla Henney

In honor of the recent Doctor Who premiere, AND I Love Yarn Day (coming up on 10/17), I bring you a Doctor Who knitting project: a TARDIS tissue box cover by Charla Henney.

I love the clever design that allows you to pluck tissues from the little light beacon at the top.

How are you liking the new season of the Doctor? How will you honor I Love Yarn Day? Share with us in the comments below!

Links of Interest:


The TARDIS Trunk

tardis-trunk

The mom over at Addled Adventures blogged about the trunk she recently made over as the TARDIS. She passed a garage sale on hermy way home from work and came across a very beaten up trunk. They were actually selling the stuffed animals inside of it and you got the trunk for free. For $5, she bought the trunk and donated the stuffed animals to charity. Someone had painted the outside of the trunk bright green and then used green and pink shelf paper to line the inside.

Mom scraped and cleaned the trunk as best she could, and peeled away all of the shelf paper. Using sandpaper, a paint scraper, and buffer, she worked on the inside until it was clean enough to look slightly presentable.

After spray painting it blue, Mom laser cut the door panels. She designed the windows and door signs, then and laser cut from Rowmark Flexicolor White/Black with 3M backing. The Police Box sign was also designed by Mom and laser cut from Rowmark Flexicolor Black/White with 3M backing.