Bride of Frankenstein Hoop

336241_15Jul16_IMG_8452

This is how I feel right now….AAAAAGGGHHH!!! I realized today the weekend got away from me (I don’t even have a good crafting reason for it!) but when I saw this hoop posted over at Craftster, I knew it was meant to be here.

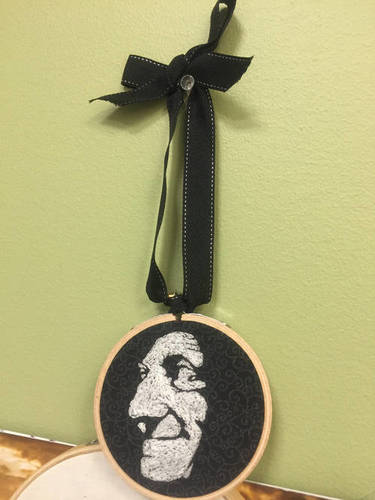
Roler, of both Washington State and Japan, made this Bride of Frankenstein hoop in the monster swap, because her partner had a great retro comic style picture of Bride of Frankenstein on her pinterest, so Roler decided to try to make a felt version of it.

The stitching around the eyes is double-strand regular sewing thread, rather than embroidery floss. The pink and white of the mouth are tiny pieces of felt, while the lips are also regular sewing thread.

For anyone interested in learning to embroidery similar to this piece, I have to recommend Lime Riot’s blog. She does a lot of felt and wool stitching and it’s good place to click through for ideas and inspiration.

Young Frankenstein Hoopla

36623_26May16_26979055460_5a76388d0f_k

Fatewineroses of southern California, recently posted this little hoop to Craftster. It was made for the Three Tiny Movie Things swap (Round 5).

This little hoop is an embroidered portrait of Igor (Marty Feldman) from “Young Frankenstein.” If you’ve never seen this example of cinematic perfection, then check out the trailer. But seriously, if you haven’t seen it yet, then why not? It’s Gene Wilder in a Mel Brooks movie!!

Make A Keyboard Kitty!

KeyboardKitty

Looking for a Mother’s Day gift idea you can make yourself? How about this sweet Keyboard Cat from Urban Threads? The tutorial takes you step-by-step through making your keyboard wrist rest. They use two separate hand embroidery patterns (available for purchase, $1 each) to embellish the cat’s face (the glasses) and the front of the wrist rest (ehem . . . what I would say is the kitty’s posterior) with the words “I’m adorkable”.  It’s a fun and simple project that is bound to be a hit with anyone, especially hard-working moms.  The hand embroidery and stitching on this one is pretty simple, and I’d say it’s safe for any beginner to tackle. Plus, you could use just about any combination of fabric color and thread color too.

Go forth and conquer, stitchers!

More Links of Interest

Paper Piecing in a Flash

FlashPaperPiecing

Designer Michelle Thompson has come up with another amazing paper piecing pattern for quilters, this one featuring everyone’s favorite speedster, the Flash. You can find the pattern on Fandom in Stitches, along with dozens more superhero and pop culture paper piecing patterns. I think what makes Michelle Thompson’s patterns so striking is her use of decorative stitching to enhance the details (take a look at all the line work–it’s all satin stitching done by machine!). This pattern is definitely not for the faint of heart, so if you’re new to paper piecing, I’d suggest looking for something with fewer pieces to start with.  You can find all sorts of ideas and even tutorials on Fandom in Stitches.  Go forth and conquer, quilters!

More Links of Interest

Join the Zompocalypse by Making Your Own Zombie Plushie!

ZombiePlushie

I just spent the weekend selling my handmade goodies at TopCon, a small pop-culture convention in Topeka, KS. One of the guests, Mike Mundy, was a zombie on The Walking Dead, so there was a lot of zombies hanging around this weekend.  All those undead inspired me to share this great tutorial on making your own zombie plushie on the blog Heidi Boyd.  This tutorial offers more inspiration than actual techniques, but if you’re familiar with basic hand sewing skills, you’ll have no problem making your little Zombie Plushie friend to hunt down brains with.  You could even mix it up a bit and use different colored fleece, felt scraps, and embroidery floss.  The tutorial offers up a great, basic starting point for your imagination to take over.  Be sure to share your adventures in zombie making with us!

Make Your Own Felt Sugar Skull Sachets

sugar-skulls-13

I don’t know about you, but I absolutely love the colorful and ornate look of sugar skulls. So when I saw this fun tutorial and pattern by Rachel on the blog Adventures in Making, I knew I needed to share it.  The tutorial has a downloadable template and step-by-step instructions, complete with plenty of pictures, so you can make your own lovely sugar skull sachet. There are even instructions on making your own sachet mix to go inside the felt sugar skull.  Wouldn’t this make a fun gift?

More Links of Interest