Huggable Monster Dolls for Kids in Need

Monsters01

A Monster to Love is this great online shop where, for every cute little monster doll you buy, Sam, Ben, and their dad Ray, donate a monster doll to a kid in need.  They partner up with children’s hospitals and even the World Relief Refugee program out of Atlanta.

I ran across their awesome work about a year ago on Craftsy, including a pattern to make your own monsters to donate to local kids in need, or send off to Ray and his boys in Colorado so they can donate the cuddly little monsters to kids in need.

Interested? Here’s the A Monster to Love PDF Pattern and Instructions.  Ray and his boys take donations year round, and you can send them one monster, or one hundred. It’s up to you!

I try to organize a Monster Making Party at least once or twice a year–they’re fun, and pretty easy to do.  Here’s how:

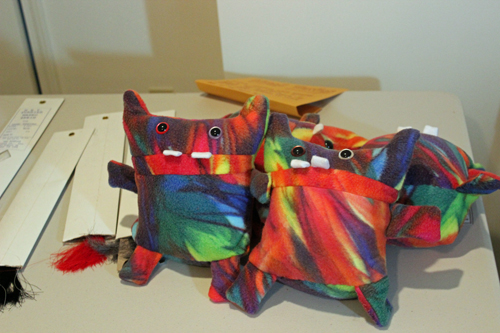
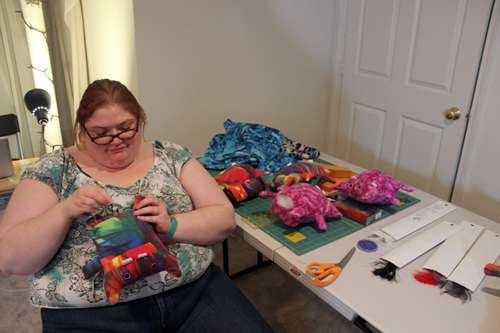
1. I buy a couple yards of fun colored fleece fabric when it’s on sale (usually in the summer).  You can get quite a lot of monsters out of a yard of fleece, or even half a yard. Just be sure to shop when it’s on sale! Along with fabric, I’ll pick up a box of stuffing when it’s on sale too (or with a coupon).  One box can last a long while and stuff a lot of monsters (probably around 30).  I’ll also purchase Safety Eyes for the dolls, which can be attached before sewing, and don’t require any sewing knowledge to install.  I purchased my Safety Eyes here, but there are tons of vendors and craft stores out there that sell them.  The 18mm sized ones are what I used, and I liked to mix and match colors too. 15 pairs of eyes cost about $15.  You can also use buttons for the eyes, but make sure they are SEWN on really well.  If the eyes are not sewn on securely, Ray and his boys can’t use them.  Do not glue on eyes.  Ray and his boys can’t use the monster dolls if the eyes have only been glued on (hello choking hazards!).

All in all, I spent about $40 on supplies for making the monsters, but I did it over the course of a couple of months.

AngieSewing
Angie brought her own sewing machine and helped build a couple monsters. That’s my mom in the background stitching away madly.


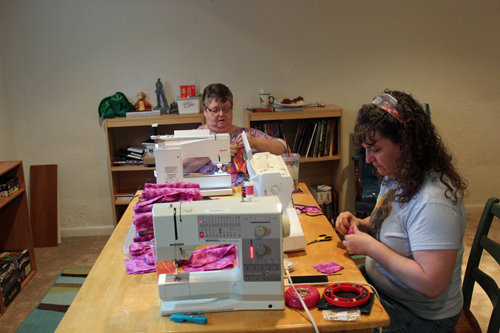
2. I set up a FB event and ask folks to bring their own sewing machines if they’ve got them, but I also tell folks that there’s plenty of other ways to help too: attaching eyes, stuffing, cuddle testing, and hand stitching are great ways to get even the most novice of crafters involved in a Monster Making Party.   Along with the fabric, stuffing, and safety eyes, I also bring along thread, scissors, and hand sewing needles for people to use.  If you’re worried about materials cost, you can always ask people to pitch in a couple bucks to help out.

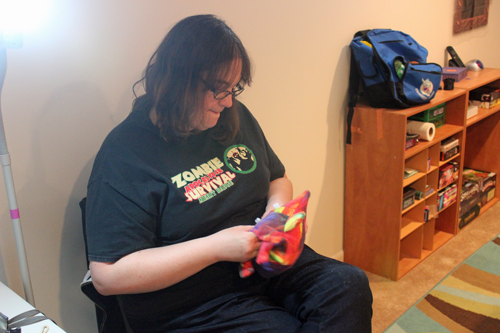
3. I cut out at least some monsters before the party so there are dolls ready to be sewn.  I also set up stations for people to work at installing eyes, stuffing the monsters, and hand sewing the monsters closed after stuffing, and even cutting out more monsters if necessary.

ChrystalSewing
Here, my friend Chrystal is stuffing a monster.


EuniceSewing
Eunice is hand sewing the monster closed.

4. We have music playing, and I ask folks to help out with some food (like chips and dip, cupcakes, and frosty beverages).  And I invite folks to come when they can and stay as long as they’d like to.  It’s a fun way to spend an afternoon or evening.

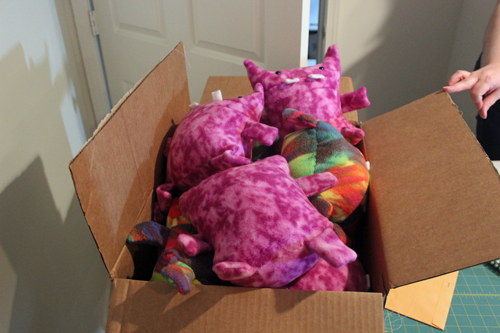
5. I’ve found three hours to be a great length of time for a Monster Making Party.  You can get a lot done, have time to chat, and still steal a cupcake too.  Once the party’s over, you’ll want to box up your magnificent creations and mail them off to A Monster to Love! Their address is on the last page of the PDF.

All our Monsters boxed up and ready to go!

If you have your own Monster Making Party, be sure to take pictures and share!!!


More Links of Interest


Outwit Winter with 8-bit Spring

Today as I gazed out my living room window at the nice April spring afternoon SNOWSTORM in my front yard and resigned myself to an entire lifetime of winter weather, I found my thoughts wandering (trudging) to…Steve from Minecraft.  Steve from Minecraft has all kinds of warm weather biomes to choose from.  Steve from Minecraft can play in the snow, sure; but when he’s bored (or his feet start to go numb in his diamond boots (are diamond boots even warm?)) he can go to a desert, or a forest, or even a jungle.  Steve from Minecraft can be standing in a snowy blizzard one second, and then take a step into a swamp biome and immediately find himself delicately wrapped in warm, balmy, humid rain.  Not to mention Steve from Minecraft’s freshly-planted daisies that he got for his Easter party four days ago don’t take one look at the incoming north winds and promptly die in their planter. (At least, not in the XBox 360 version.)  So why should Steve from Minecraft get everything?!?!

Good news!  Instructables poster lirpaeel has shown us how to bring some of Steve’s coveted greenery to our very own biomes!

minecraft tree2

The best news?  You don’t even need to build an ax to knock it down!  (Or a sword, like the kid in the picture.)

Happy Spring!

Return of the Geek Cat

cat toys2

There was a lot of celebrating on the farm today.  After three weeks and two days, we finally found our cat, Ari!  Apparently he was hiding out in our closest neighbor’s shed the whole time.  I was pleasantly surprised that even after a 23 day stint in the pitch-dark shed he didn’t really resemble Gollum at all.

In addition to more cuddles than he’s comfortable with, I’m making him these geek cat toys as a welcome home gift.  (Underneath that cool cat exterior, I have no doubt that Ari is a total Whovian, Final Fantasy, AND Harry Potter nerd.)  The best part?  No sewing machine is needed for these adorable toys from Allons-Y Kimberly.

Oh man, remember when we posted this?  What a charming place for a geek cat to hang his hat!

A Bracelet DIY Using Old Comics

ComicBookUpCycleBracelet

I have a friend who creates awesome jewelry by recycling old comics, which got me thinking . . . what else can a person make with old comics? That’s how I found this tutorial on Oh! Rubbish! Blog. It’s a super easy DIY, with great pictures.  Plus, I’d bet magazines, newspapers, and old photos would probably work well with this idea too.  Just think of the possibilities!

Magic Mirror on the Wall

I have one of those long, dark hallways in my house that’s terribly difficult to decorate.  There’s just one tiny window on one end, so I’m always looking for ways to lighten it up.  This evening I tried putting up three mirrors of different sizes…and it looks excellent!  Clearly, if three mirrors looks excellent, five mirrors would look even better (and ten would look incredible)!  I can see this quickly becoming a new obsession…

Have you seen this lovely LEGO mirror spotted on OurNerdHome?  It’s singularly simple to make (and will be featured prominently in my new mirror hallway by the end of this weekend):

lego mirror3

I particularly love the gold spray paint – something we go through a lot of at our house.  Have you ever wondered which gold spray paint to use for your projects? Julia at ChrisLovesJulia experimented with several different kinds, and writes about her findings here.

goldpaint3

What are your favorite mirror projects?  I’d love to see!

Captain America Tie Dye DIY

CapTieDyeShirt

I ran across this awesome tutorial on iLoveToCreate, posted there by Alexa.  The tutorial is great, and this technique is surprisingly easy.  I recommend watching the short, 3 minute video and reading the instructions.  It’s a little labor intensive, and messy, but so worth it, don’t you think?

More Links of Interest